BRIEF US!
Design illuminating activations around the world with us.

THANK YOU FOR YOUR REQUEST
Thank you very much for your interest in EIDETIC MARKETING.
We look forward to working with you.
We will contact you soon.Thanks Again.

THERE WAS A PROBLEM WITH YOUR SUBMISSION.
Have you checked all the required fields?
We want you to write your Company, Name, E-mail, Budget, Country to Execute, Website URL, Wanted Services and Project Description.Thanks.
Game Exhibition Hero Installation: A Complete Fabrication Guide
March 23, 2026
Game Exhibition Hero Installation: A Complete Fabrication Guide
Walk into any major gaming event — G-Star, Gamescom, or Anime Expo — and the booths that draw the largest crowds almost always have one thing in common: a game exhibition hero installation.
A towering mech. A large-scale weapon prop. A character brought into physical space at architectural scale.
In live exhibition environments, these installations do more than decorate a booth. They deepen immersion in the IP, drive organic social sharing, and often become the point where people naturally gather — a meeting spot, a landmark, even a wayfinding anchor in a crowded show floor.
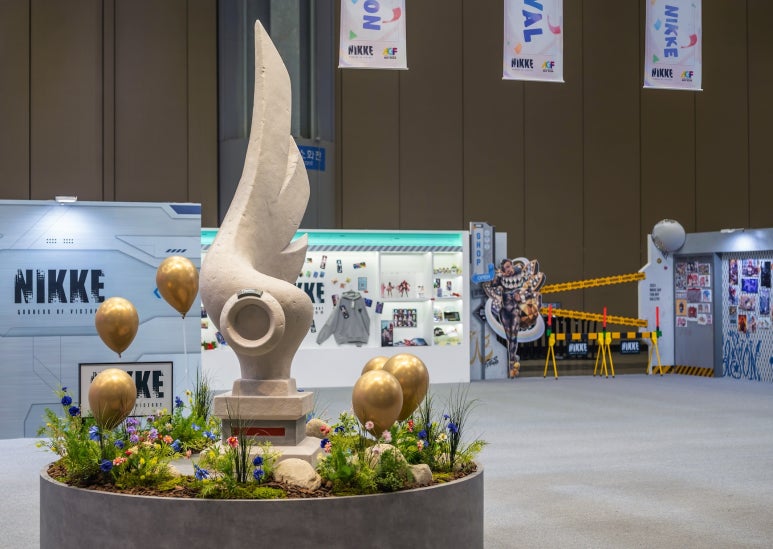
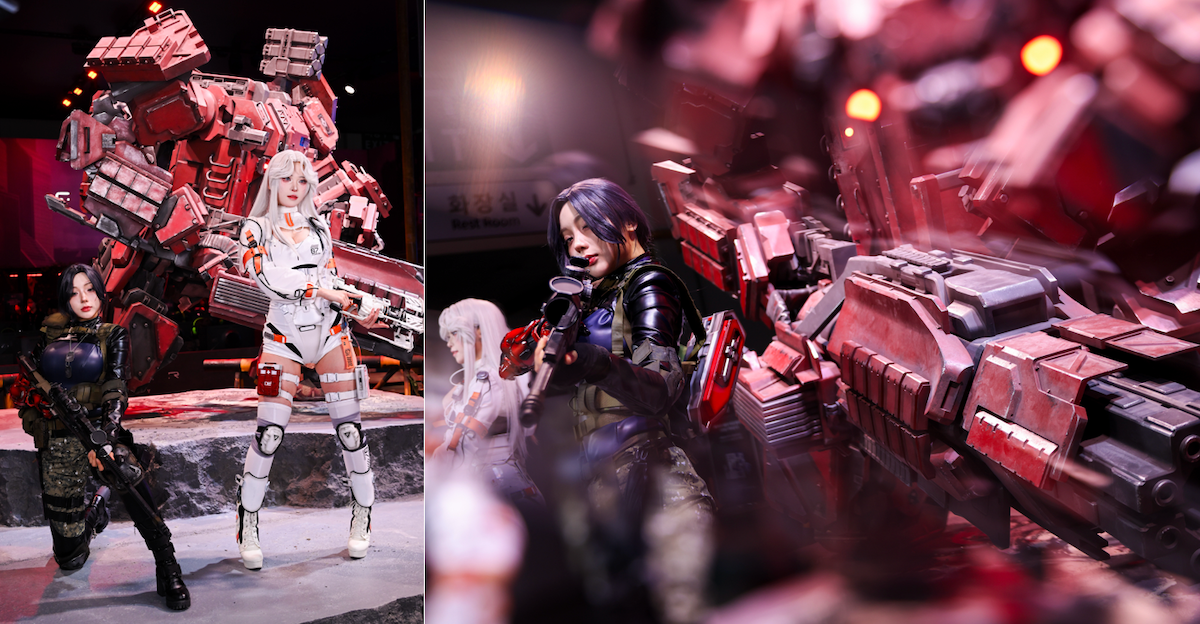
At Eidetic Marketing, we’ve seen this impact firsthand. While leading exhibition marketing for Shift Up, we produced FRP sculptures based on key elements from NIKKE and Stellar Blade.
One of the most memorable pieces was the Stellar Blade aircraft sculpture, which symbolized the beginning of the game’s world. It created strong visual impact at G-Star, received positive feedback from industry professionals, and was ultimately installed at Shift Up’s headquarters after the event.
That kind of outcome leads to the same set of questions from studios and marketing teams:
What kind of files are needed to turn a game asset into a physical sculpture?
What materials are used to build large-scale installations?
Can these structures be reused or installed permanently after the event?
This guide answers those questions based on real production experience. We’ll walk through the key stages and practical considerations behind building a game exhibition hero installation — from asset preparation to material selection and final paint inspection.
Let’s break down the process step by step.
1. Translating Game Assets into Physical Design
The foundation of any game exhibition hero installation is accurate 3D source data. The type and quality of the files provided can directly affect both production timeline and cost.
Preferred File Formats for Sculpture Production
For sculpture production, 3ds Max (.max) files are generally the most preferred because they are easier to review and edit during the fabrication process. Blender (.blend) files are also useful, especially for checking original asset data.
By comparison, FBX and STL are usually secondary options, and file compatibility should always be checked before production begins.
File Conversion Risks and Missing 3D Data
We also recommend reviewing Maya and ZBrush files carefully before handoff, since shape distortion or data loss can occur during file conversion.
If only 2D concept art is available, additional 3D modeling will usually be required, which can increase both cost and lead time.
Why High-Poly Models Matter
Another important consideration is polygon density. In-game low-poly models are optimized for performance, but they often lack the surface detail needed for physical output.
For fabrication, we work with high-poly models because they preserve the form and texture information needed for a more accurate sculpture.
Structural Review Before Fabrication
Before production starts, we review every file from a structural perspective. Some game assets are not designed to stand on their own in real space, so we assess balance, internal support requirements, and whether a separate base or pipe structure is needed.re.
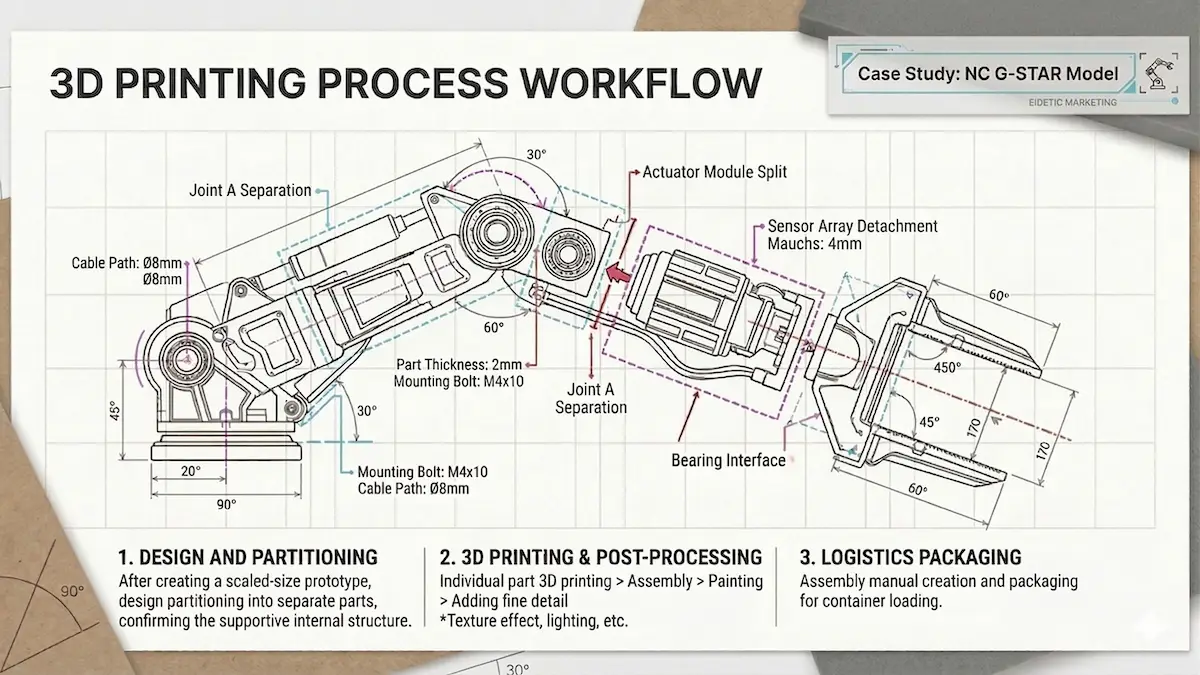
2. Engineering and Fabrication
Once the design is finalized, the project moves into engineering and fabrication.
This phase typically includes internal metal frameworks, CNC machining, foam sculpting, and FRP (Fiber Reinforced Plastic) production.
For large-scale game exhibition hero installations, modular construction is essential. Structures must be designed for transportation and assembly while maintaining seamless visual continuity.
Choosing the Right Sculpture Material
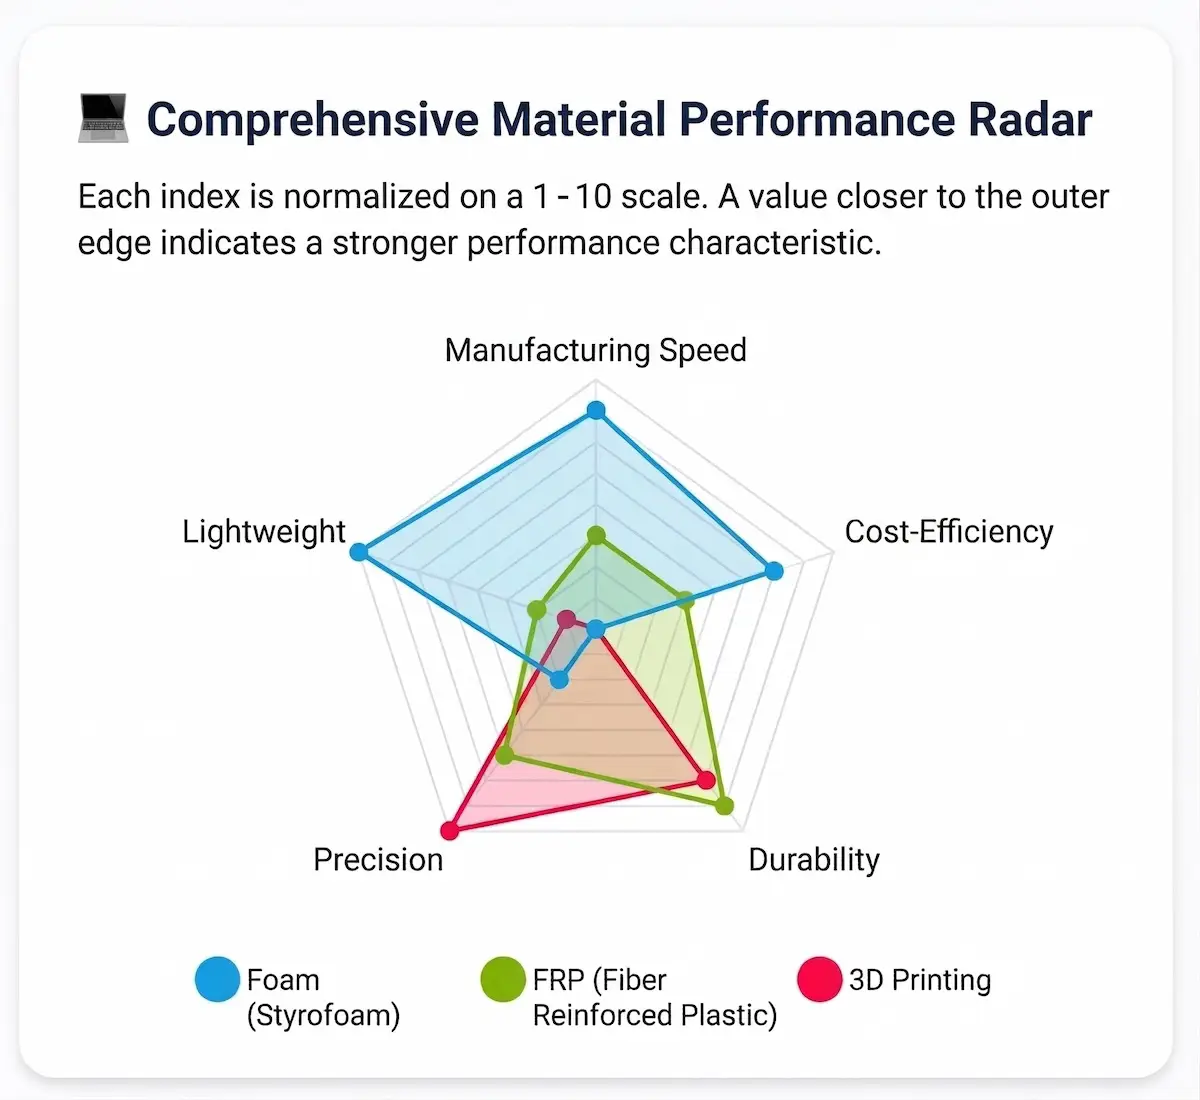
Choosing the right material is one of the most important decisions in building a game exhibition hero installation. Each material affects production speed, durability, surface quality, and cost differently.
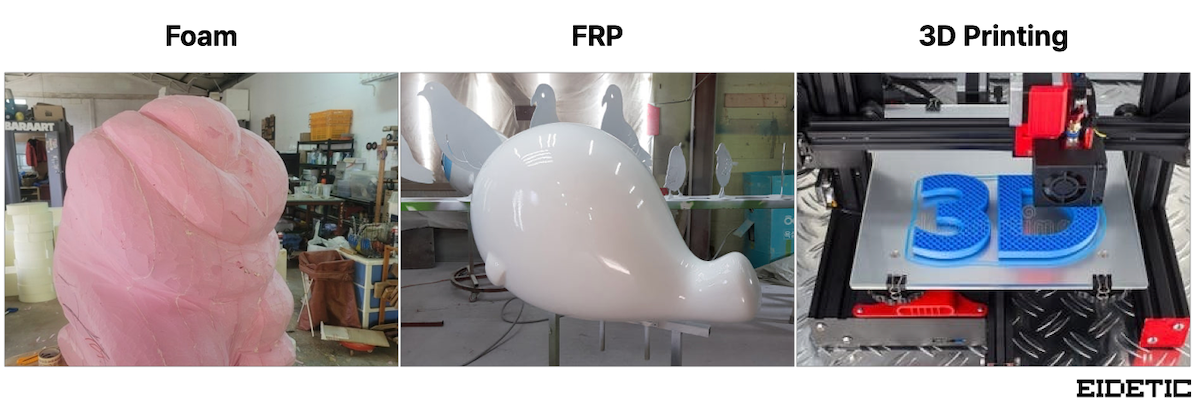
| Category | Foam | FRP (Fiber Reinforced Plastic) | 3D Printing |
|---|---|---|---|
| Characteristics | Lightweight and fast to produce. Lower durability. | Strong and durable. More complex production process. | Best for precision and intricate detail. Higher cost and longer production time. |
| Process | Foam sculpting → urethane coating → painting | Master model (CNC/sculpting) → surface finishing → mold → FRP lamination → reinforcement → painting | Sectional printing → support removal → sanding → assembly → painting |
| Selection Guide | Large-scale, short-term installations | High-detail, durable, reusable sculptures | Hard-surface parts and precision components |
Foam — Best for Scale and Speed
Foam, typically EPS or extruded polystyrene, is the go-to material for giant props and large-format hero installations where production speed and physical scale take priority. It is lightweight, fast to produce, and efficient for oversized builds, but it is less durable than other materials.
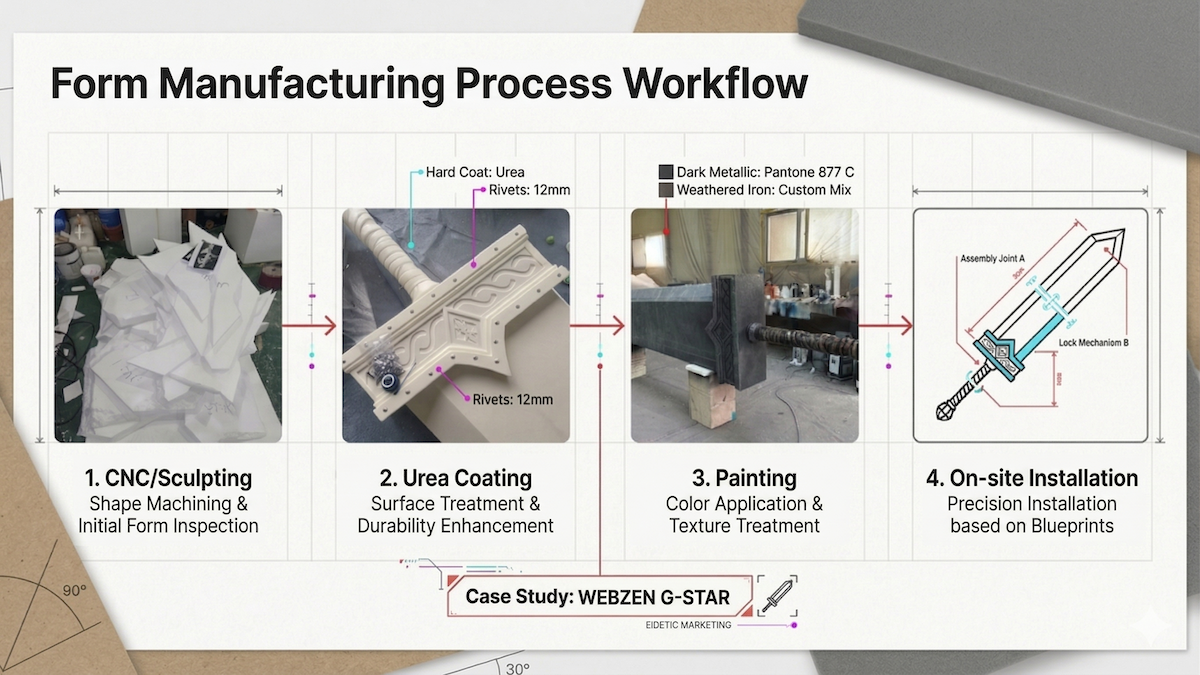
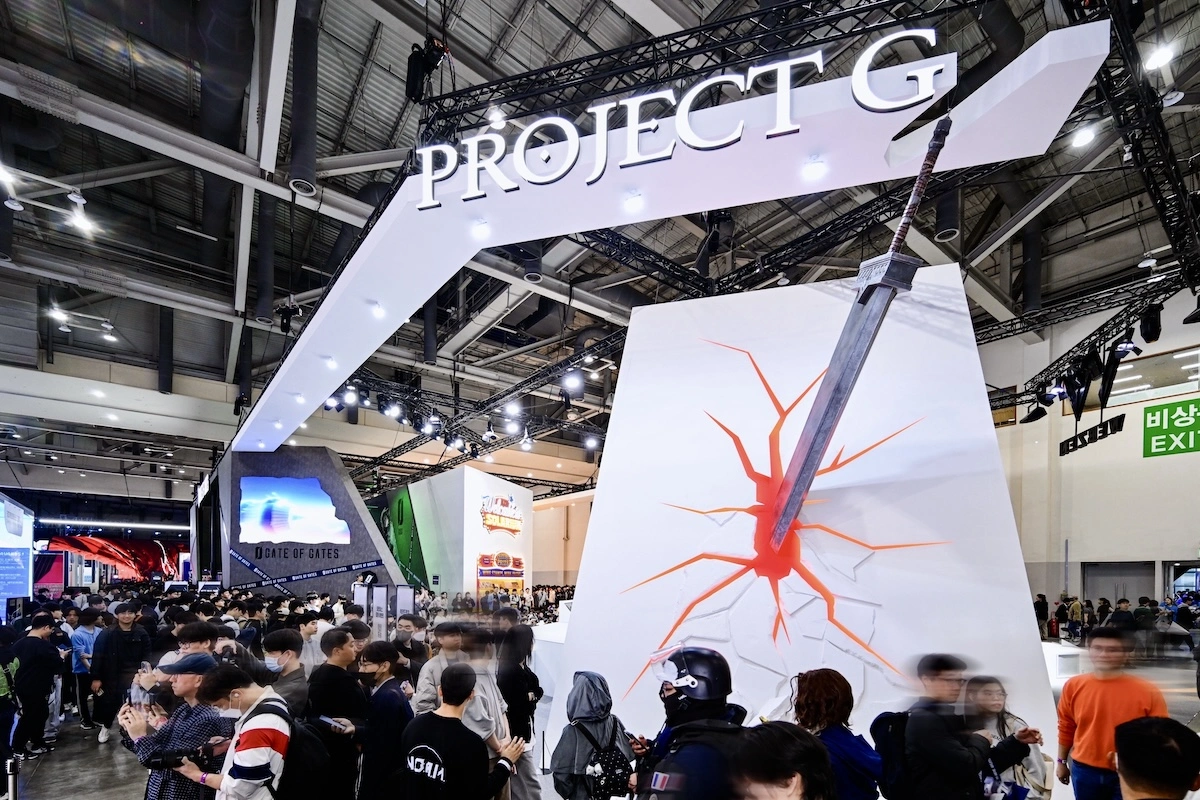
For Webzen’s G-Star 2025 booth, we fabricated the Project G greatsword in foam and installed it diagonally through the exterior wall of the booth at the BEXCO Hall 1 entrance. Because the piece was positioned to cut across the wall rather than stand on a base, we used precision overhead rigging to hold its angle and prevent drift throughout the four-day show. The result was a high-impact landmark that visitors could see from across the hall the moment they entered.
FRP — Best for Durability and Long-Term Display
FRP, or Fiber Reinforced Plastic, is the material we recommend when a sculpture needs to outlast the event. By combining resin and fiberglass, FRP creates rigid, structurally stable forms with a refined finish, making it suitable for repeated transport, long-term installation, and permanent display in offices, lobbies, or showrooms.
Many game IP sculptures that remain inside studio spaces after an event are built in FRP for exactly this reason.
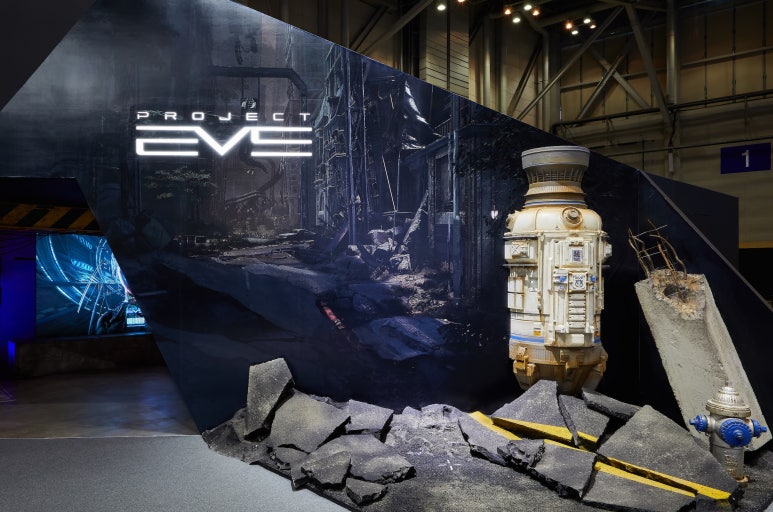
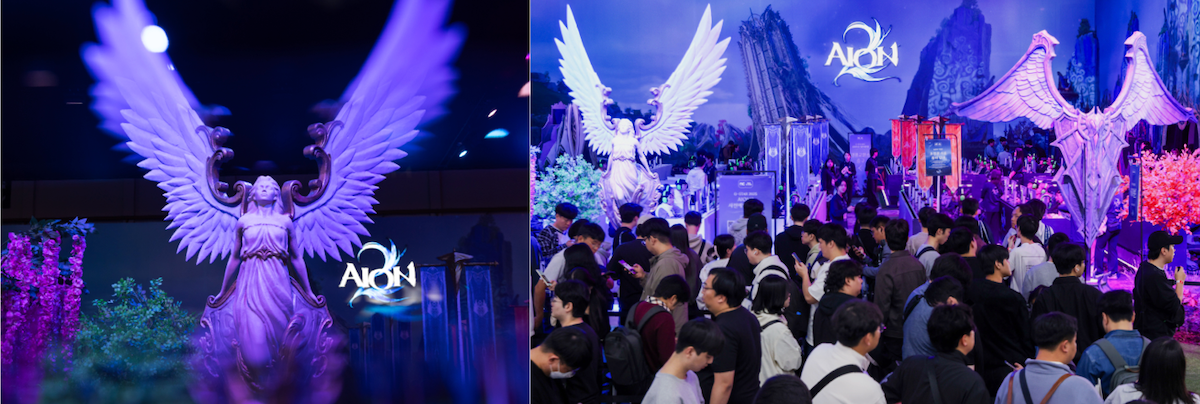
For the AION2 demo zone at NC’s G-Star 2025 booth, we installed Kisk sculptures at the zone entrance. The Kisk is one of the most recognizable objects in the AION universe — a sacred device associated with the preservation and revival of Daeva souls. Because of that significance, we chose FRP for the paired Elyos and Asmodian sculptures to achieve the structural stability and finish quality the piece required.
3D Printing — Best for Precision and Complex Detail
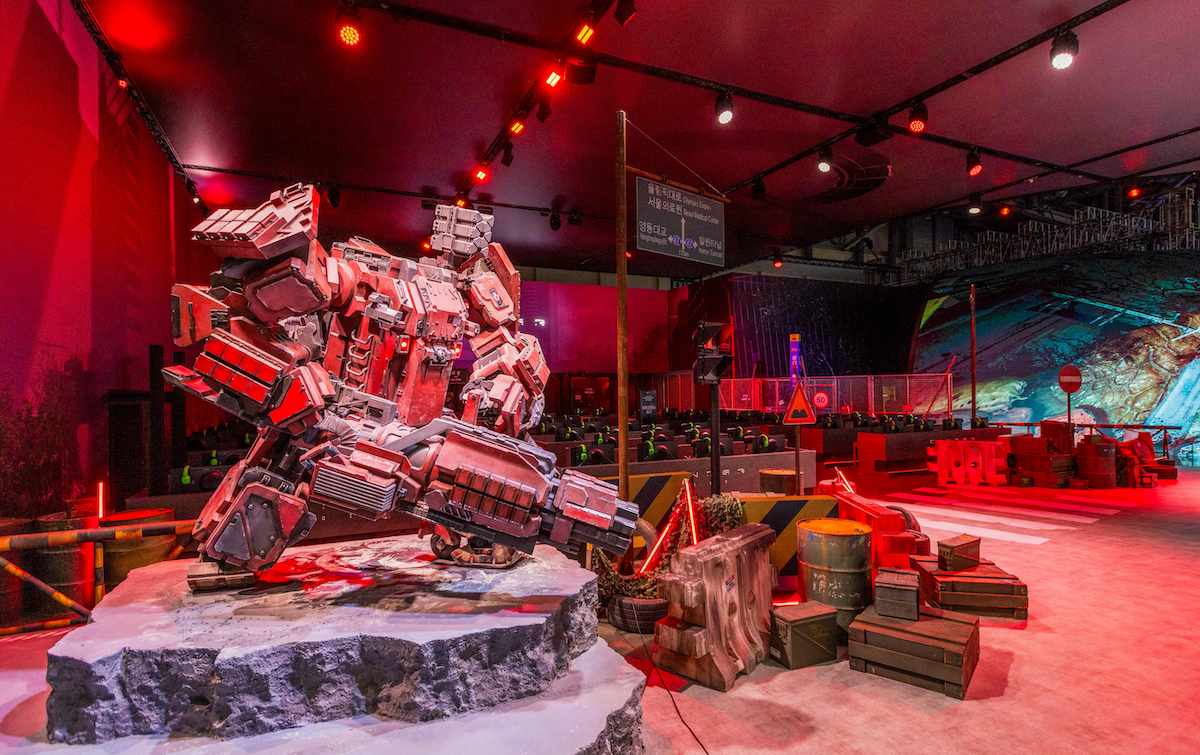
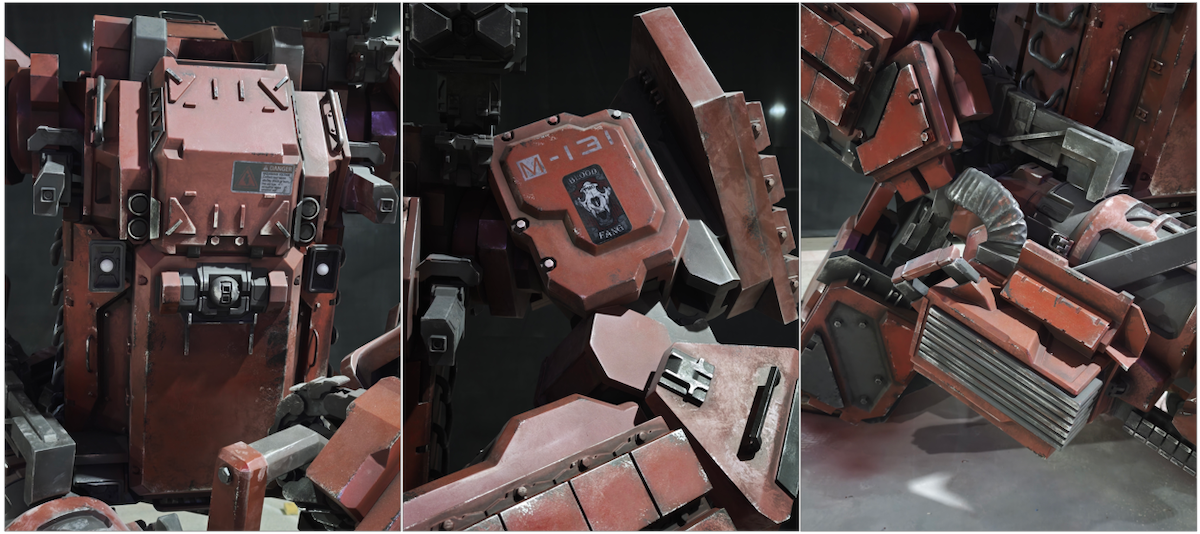
For mechanical designs, robotic forms, or any sculpture where surface density and geometric accuracy define the final impression, 3D printing is often the most effective option. It delivers the highest level of form precision and detail, but it also requires more production time and comes at a higher cost, especially at large scale.
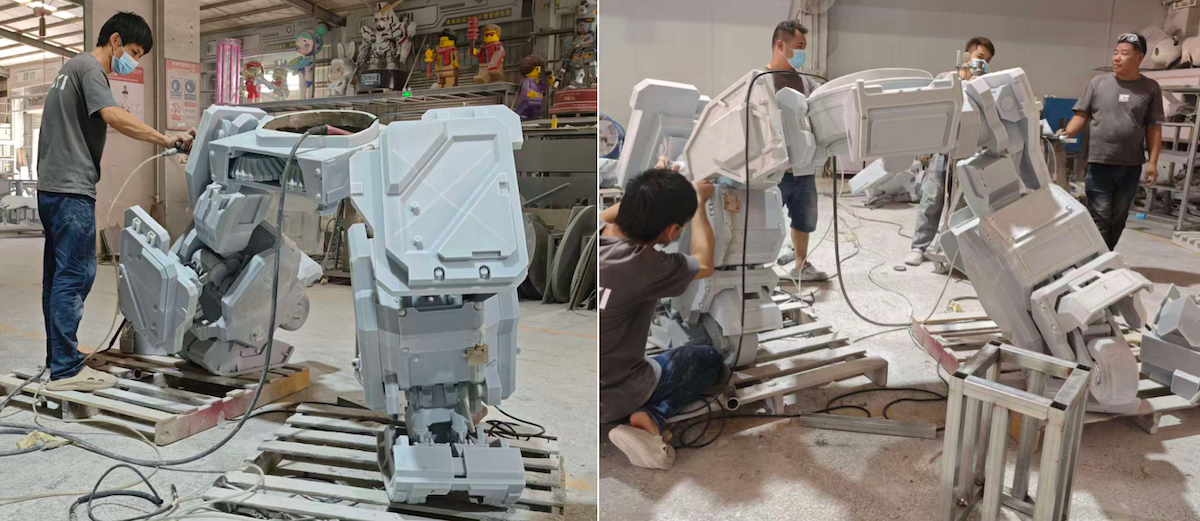
This makes 3D printing especially suitable for hard-surface builds and highly intricate components.
The Cinder City Powerloader is a strong example. Its layered mechanical complexity required a level of surface accuracy that foam or FRP could not reproduce in the same way.
We produced the sculpture section by section, then assembled the finished parts into a single structure. To match the post-apocalyptic tone of the IP, we applied heavy grunge texturing so the exo-suit would feel used, damaged, and repaired. On the show floor, the Powerloader became one of the most photographed installations at G-Star 2025.
3. Surface Finishing and Paint Inspection
Once fabrication is complete, the installation moves into surface finishing. At this stage, the sculpture begins to reflect the game IP more clearly.
Even a well-built structure can lose impact if the texture, color, or finish feels off. For this reason, finishing plays a critical role in the final result.
Color Accuracy and IP Consistency
Before painting begins, we create a color guide. This step defines how the sculpture will translate the original game asset into physical color. We collect reference materials such as concept art, in-game captures, and official color data, then match key colors and define finish types — gloss, matte, or metallic. This guide ensures everyone works from the same visual standard throughout production.
Color accuracy directly affects how audiences recognize the IP. Even small shifts in hue or finish can change the impression of the sculpture, so we check color continuously during the painting process.
The 5-Step Painting Process
To maintain IP accuracy, we follow a structured painting process. Each step builds on the previous one.
1. Sanding and surface correction — The surface is cleaned and refined, removing seams, imperfections, and uneven areas left from fabrication.
2. Primer coating — A primer coat stabilizes the surface, improves paint adhesion, and reveals any areas that still need correction.
3. Base color application — The main color is applied to establish the overall tone based on the original game asset.
4. Detail painting and texture work — Secondary colors, markings, and surface textures are added, recreating materials such as metal, stone, fabric, or armor.
5. Weathering and protective finishing — Where the IP calls for it, weathering effects are applied, then the surface is sealed with a protective coating to preserve the finish.
Final Paint Inspection Checklist
At the final stage, we run a final paint inspection based on three key criteria.
- ✔️ Color guide alignment — compare the sculpture against the approved color guide and confirm that primary and secondary colors match the intended values.
- ✔️ Lighting condition test — evaluate the sculpture under different lighting environments and check how colors appear under show conditions.
- ✔️ Surface finish and overall quality — review the overall finish, including texture consistency, gloss balance, edge quality, and completeness of detail work.
These three factors must work together. When color, lighting response, and surface quality align, the sculpture can accurately convey the intended mood and detail of the game world.
In this context, color functions as a visual language. It plays a key role in how the audience understands and experiences the IP on the show floor.
In the next chapter, we’ll cover the key considerations for transporting and installing a hero installation on-site — and a post-event checklist to close out the project properly.
Ready to Build Your Next Hero Installation?
Whether you’re exhibiting at Gamescom, G-Star Korea, Anime Expo, or Tokyo Game Show, we handle the full production of your game exhibition hero installation — from first asset review through painting, weathering, and on-site installation.
We work directly with studio art teams to ensure every IP sculpture reflects the game world faithfully and commands the floor on show day.
Explore more in our News & Insights section, where we cover game show strategy, booth design, and experiential marketing for global gaming events.